Pages

12.20.2011

Scrappy Kid Christmas Ornaments

Growing up, we always had a real Christmas tree.  The first few years of married life I had a real tree too.  My husband wasn't so keen on the idea.  Logically it makes more sense to get a fake tree... cheaper in the long run, that whole bursting into flames thing, less mess, yada yada.  However, sentimentally, I was pretty attached to having the real deal.  Last year he convinced me it was time to take the fake tree plunge.  I agreed on one condition: we were going to get the best fake tree we could find.  And thanks to the American Express points we had built up... money was no object.  (Well, it was, but I wasn't getting a $1000 tree or anything) I scoured and found the one I wanted online. A few clicks later in showed up via UPS.

Houston, we have a problem. This tree is HUGE.  Apparently things look different in tiny pictures on the internet.  I had no idea it was going to be so large. Let's just say our living room is very festive... and half taken up by a massive tree. Oh well... one day we will have a house with a living room big enough to non-ridiculously accommodate our Time Square-sized tree. In the mean time, I'll just make ornaments to fill it up. Cue Scrappy Kid Ornament!


Like it?  My 1-year old made that. Well, I made the bow, but he did everything else. : )

Here's what you need.
• Styrofoam Balls (with or without dirt... doesn't matter) Mine were used as make shift golf balls in the backyard, naturally.

• Fabric Scraps

• Glue (Any kind of kid-friendly craft glue that dries clear will work. Mod Podge would be great too)

Ribbon scrap to make the bow
Thin string or ribbon to make a loop
Hot glue to attach those

Step 1
Set up kids and supplies (minus the hot glue) in a glue proof area. My kids worked on paper plates.

Step 2
Help kids cut scraps into 1" - 2" pieces. (I tried to give my daughter coordinating girly scraps, and my son coordinating boyish scraps)

Step 3
Generously coat a 2"-3" section of your styrofoam ball in glue. Apply a scrap or two and smooth it down with your finger.  Glue should get on top of the scrap too and on the edges.

Step 4
Continue covering the entire ball with glue and scraps, working in small sections.


Step 5
When dry, poke a small hole with a pencil about an inch deep into the ball. Put a dot of hot glue in the hole and poke 2 ends of a thin ribbon or string in there with the pencil to make the loop. (Adults = hot glue, not kids)

Step 6
Tie a bow with a ribbon or fabric scrap and hot glue it at the top. Done.

Kaley takes her ornament very seriously. (And yes she had a hair cut in between photos)

Austin is a little more excited.


11.02.2011

Easy No-Sew Circus Jacket


The Big Top took over my office this year for Halloween.  No really, we are crazy.  You've never seen cubes transformed into a giant tented circus land like this.  Last year was fairytales (I was Peter Pan), this year was Circus.  My "act" for the big show was Tightrope Walker (not to be confused with street-walker... you might be inclined to lean towards option 2 when you see the amount of makeup on my face).  I remodeled my cube into a circus tent ala lots of color toner, hot glue, streamers, and a rope from Lowes. See? Yes, that is my cubicle.

So the cube is done.... what does a tightrope walker wear?  Probably spandex, but since body-clinging, leave-nothing-to-the-imagination wear is not what I'd like my co-workers to know about me, I went for vintage tightrope walker.  After some Googling, I made up my mind that a tutu and parasol were the way to go.  First stop, Goodwill with my friend Christy from Through My Looking Glass.  She actually found the tutu/shirt combo I ended up wearing and highly suggested I buy.  Great idea... $4.99 later, it was mine.  Just one problem, it had spaghetti straps.  I probably could have gotten away with it for Halloween... but still, it's work and I wanted to be a little more covered.  That's when I decided to make a jacket.  Here's what I did.

I started with a long sleeve T-shirt in my closet.


Then I bought some shiny trim from Walmart. (PS. I only ended up using the braided trim)

Next, I cut the shirt like this.


And then, I eyeballed and cut some rounded edges on the front. 


Then I started hot glueing my trim.  I started at the collar and worked my way down the front of the shirt/jacket first.  Keep going around the back and back up the front of the other side, ending at the collar again.  If you run out of trim, just start a new band right where the other one ran out.  You can't even tell on mine where the trim starts and stops.


Then I started around the collar. (oh yes, that glue gun has been well used)


After finishing the collar, I had a tiny piece of braided trim left.  I unbraided it and used the 3 strips to make loops on the front.  I just hot glued those suckers right in place too.  The last thing I did was take two silver buttons off my tutu and glued them to the top... you can see them in the next pics.

And there I am in all my Tightrope Walker glory.


Yup, added leggings too.  Tulle is quite see through ya know.


And since I was going for a vintage look, I  had some fun with Photobooth and took some vintage-style pictures.


Nice looking jacket, eh?


And so you know I'm not the lone crazy woman dressing up at work, here's a picture of our entire department.

PS: I work without a net. :)


10.20.2011

Holy Crap... 100 Followers

Just a note to say, I hit 100 followers and thought it would be nice to document when that happened.  So here we are, short and sweet.

I promise to post something semi crafty and interesting soon... but Halloween, my brother's wedding, my kid's birthday, dad's birthday, parent's anniversary, 3 Halloween events on top of actual Halloween that all require costumes have kept me slightly busy.  I just finished 3 dozen Spiderman cupcakes for my, as of tomorrow, 4-year-old's daycare birthday celebration and it's 11pm. I need some sleep... and exercise. I wonder if you can combine the two? I see a lot of coffee in my future for tomorrow. I am officially rambling.

Good night. Tomorrow I will be the mom to a 4-year-old. Crazy how fast those years went.

10.03.2011

Make your own labels cheap!


I made real clothing labels for less than $13? No really. I am not a magician... or a mime. But I don't know what that has to do with anything.


When I first thought it might be nice to have labels sewn into the things I made for my kids (mostly so my 3-year-old could know front from back) I looked into woven labels... and quickly gave that idea a big fat "Psssshaaaaa". As in, "Pshaaaaa right! That's never going to happen."  Holy crap.  Those suckers are expensive.  On top of that, there are minimums that I'll never use up on my couple-times-a-month sewing projects. Lame.


Then came See Kate Sew. I think I found her tutorial via pinterest?  Not sure. Anywho, I must credit her with this great idea and tutorial. Here's what I did.


Have you heard of Spoonflower?  They will print fabric for you.  It's awesome.  If you've ever uploaded photos to be printed and sent to your house on shutterfly or snapfish, it's pretty much the same thing... except on fabric! 


I took my blog header, and made it a jpg.  I think you can do this in Paint.  Sorry to be all fancy, but I have Illustrator and Photoshop, which I used... but seriously, it's a jpg.  You can do it in Word I think. And if you can't, Google how to convert what you have.  You don't even need a "logo".  You can just type out "Mommy made it" or something like that and save it as a jpg. Are you still reading?


Add a bunch of white space around it.  I other words... crop it with a lot of room on all sides. Maybe an inch on each side? Upload that sucker to Spoonflower.  
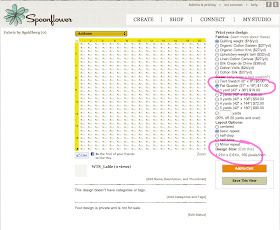
Once your jpg is uploaded, it should look something like this.
Now here is where I admit I messed up.  See the rulers along each edge?  And see how my design isn't even 1" long?  Yeah, I failed to pay attention to that the first time I ordered and my labels were way too small.  So... see where it says Design Size on the right?  Mess with that to make your labels the size you want.  If you still can't figure it out, upload a bigger jpg.  Like I said it took me two tries.

I ordered the quilting weight in a fat quarter. 

About a week later.... it arrived.

The one on the right is the first batch I ordered... too small!  No worries, I did it again... and lightened the yellow.  Much better.


Check out all those labels!  And you paid a grand total of $11... plus shipping, but I think my shipping was like $1.  Awesome.


Cut those suckers out.  See why we left lots of extra white space?

Iron in all 4 sides.  You'll probably burn the crap out of your fingers on this step. : )


Stitch all the way around.

Done!  I think my total cost is less than 6 cents a piece.  I ordered a fat quarter... you could order a yard too but that's a crazy amount of labels : )  Let me know how it goes!


9.20.2011

Fall T-Shirt Quilt Tutorial


This might be the perfect fall project... the t-shirt quilt.  First of all, you get to recycle all of those old college/school/sports T-shirts taking up too much space in your drawers.  Second, you can take it with you to all of your chilly fall sporting events and show support for your school/team.  And third, talk about warm and comfy... it's a blanket made of all of your super soft well-worn t-shirts!  What could be better?


Now for the really cool, inspiring, "I can do that" moment.  This quilt was made by one of my friends from high school, Brooke, (reconnected through myspace back when myspace was cool) who never sewed before (unless you count 7th grade home ec... like myself). No really. I got an email from her one day saying she was interested in making a quilt and what should she buy... including what kind of machine.  After I wrote back a novel of an email listing everything I owned for sewing, she emailed me back a couple months later with this!  If that's not an if-she-can-do-it, I-can-do-it moment, I don't know what is.


Ready to make your own?  (Huge thanks to Brooke for sending me all of her step by step photos and tips... and for letting me blog about it)


Supplies:
• T-shirts.  The amount of t-shirts will depend on what size quilt you would like to make. Brooke did 5 shirts across and 6 shirts down, making her quilt approximately full size if you were to put it on a bed. Also, if you were to use the fronts and backs of your shirts, you would need fewer shirts.
• Fusible Interfacing.  You need this because t-shirts are really stretchy and thin.  The interfacing will make everything much more stable and easier to cut into squares.  Get the kind that only has glue on one side. You will need enough to back each of your t-shirt squares plus a little trim excess.
• Large panel of fleece for the back of your quilt.  It needs to be slightly larger than your finished quilt front. You could use a thinner and lighter fabric, but go with fleece for a warmer quilt.
• A sheet of batting the same size or larger than your quilt front.
• 15"x15" Square Quilter's Ruler (or whatever size you want your squares to be)
• All your regular sewing crap... machine, thread, pins, scissors, rotary cutter, rulers...


Step 1: Gather your t-shirts...
and cut the portion of them out that you want to use.  Make sure to cut your shirts slightly larger than the desired finished square size. (AKA, slightly larger than the square ruler you are going to use to trim your t-shirt pieces to size).


Step 2: Iron fusible interfacing, following the manufacturer's directions, to each of those slightly larger pieces you just cut out.
Some fusible interfacings require you to iron them on using a damp towel (above).  Follow the directions yours comes with.


Step 3: Trim your pieces, now backed with interfacing, using your square ruler.  After this step they should all be perfect squares (okay, somewhat close), all the same size.


Step 4: Lay out those squares, side by side, until you find an order you like. Keep going until your entire quilt is arranged on the floor... or giant table if you have one that big.


Step 5: Go row by row, sewing each square it its neighbor, right sides together, using about a 1/4" seam allowance. When this step is done you will have several long strips.


Step 6: Sew your strips from step 5 together, right sides together, using a 1/4" seam allowance again. Ta dah! You have a quilt top.


Step 7: Make your sandwich. Lay your fleece out on a big flat surface. (If using a fabric with a right side and a wrong side, make sure your right side is facing down) Also good to point out, Brooke had to sew two large pieces of fleece together to make one piece large enough to cover he whole back. Lay your batting on top of that (the meat). Lay your quilt top on top of that, right side up.


Step 8: Baste.  You need to stick your layers together somehow so that when you start sewing, they don't shift all over the place.  You can use fusible batting like I did on my meandering quilt, basting glue spray, pins, etc.


Step 9: Quilt!  Brooke used a sort of zig zag diagonal pattern that looked like this.


She applied tape in lines across the front of her quilt and sewed beside them as a guide.  She has also warned me, and I quote, "IMPORTANT:  Don't sew on the tape." Got it?


Step 10: Add your binding.  Brooke used the same fleece that she used for the back.  And since fleece doesn't fray, you don't even have to fold it under twice : )  I like that idea.


Done!


Optional:  Did you notice two of Brooke's squares are made up of nine smaller squares?  That's because she used the small pocket sized design from the fronts of her shirts to make those.  She used a 5 1/2" square ruler as her guide to cut those tiny squares out. Then sewed the tiny squares  together, just like you would the rest of the quilt top, to make a full sized square.  A little more work, but a really cool effect and a great way to add interest.


I hope you are inspired!  Read your sewing machine manual, ask the ladies at the fabric store, Google, search youtube, or email fellow sewing bloggers... worked for Brooke : )