Lately I have come to the realization that I have a problem. When shopping for home decor (curtains, furniture, fabric, lamps, etc... Who am I kidding, I do it with clothes too) I find things I love in stores and online, look at the price, and immediately think... WHAT?! Who are they kidding? It's not even lined! I can make that! This happens several times a day, usually. The result is a list of projects a mile long, a house full of Goodwill furniture, and 25 trips to Home Depot.
That's pretty much the story with my DIY Chevron Curtains. I'm in the process of creating a guest room/sewing room. I say "creating" because we did not have a guest room in our previous house and I'm starting from nothing. A completely empty room. I decided the theme is going to be yellows and grays (are you realizing what room the side chair is for?) and started to look for curtains. Ummm, yeah... I just can't do it. $50 per panel or more at most stores. Even Target curtains are in the $30 per panel range and that's not even a cool pattern. Call me cheap, I don't care. Time to hit up Pinterest for some DIY ideas.
In my search I came across Painted Faux Ombre Chevron Curtains from Owen's Olivia. I LOVE them! Time to break out the 3m painter's tape and make some chevrons! Off to Home Depot!
Supplies:
- Curtains to paint (Mine were 2 leftover IKEA panels that were in my son's room at the last house)
- Paint (craft or house paint)
- Tape (I used 3M ScotchBlue Painter's Tape, 2" size... you will need 2 rolls if you don't reuse some tape from one panel to the next)
- A small roller and tray
- Fabric Medium (I used Martha Stewart Tintable Fabric Medium)
- Ruler
- Big drop cloth or some painter's plastic
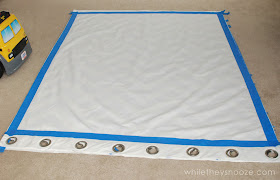
Step 1: Tape off a boarder.
This step is optional but I like the look of a boarder on all the sides. Also, in the Owen's Olivia tutorial she mentioned they paint bled a little when she painted over the seams... so I avoided the seams. (Power Wheels school bus keeping me company to the left)
Step 2: Mark out your first row of chevrons.
I decided I wanted 4ish zig zags across my curtains. I measured the width of my curtains in between the taped boarder (54"), divided by 9 since that's how many points I would need to make 4 zig zags. That gave me 6. So I put a small dot with a washable fabric pencil every 6 inches. Then every other dot, I measured up 6" and put a dot there. This is where the points of my chevrons are. You can make your chevrons as close or as wide as you want. Looking at the pictures might clear that up a bit. (I promise that is the last of the math on this project)
Step 3: Begin taping your first row.
Start from the corner and make the inside points of your chevrons line up with your dots (look at the 2nd photo if that's confusing). Once you have them lined up, trim the edges into a nice clean point... like this. I just used the edges of the cross tape as a guide.
Step 4: Use strips of tape as spacers and tape the rest of your chevrons.
Congratulations... the hard part is over. Now it's just a matter of using tape as a spacer and adding row after row until you get to the other end of your panel. Remember to go back and trim your points like in step 3.
Step 5: Roll out some plastic and get ready to paint.
You can use whatever you want to protect your floors. I had a roll of painter's plastic in my garage. Tape everything down so it doesn't move on you.
Step 6: Mix fabric medium and paint and get rolling.
Follow the directions on the back (I eyeballed the measurements). Mixed everything in my paint tray and started rolling with a small foam roller.
Step 7: Keep rolling!
You are going to have a seriously sore butt tomorrow from all the squatting. Trust me.
(I look sad because my butt hurts)
I peeled pretty much immediately after I got done painting. A few spots were still damp. Didn't seam to make a difference. FYI: This project uses a lot of painter's tape.
Step 9: Let them dry and heat set them with an iron.
(I may or may not have done this step) Tee hee.
You're done!
You're done!
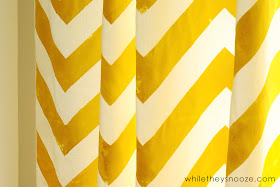
And if you're wondering if they look painted... yes, they do. And I love it! I think it looks very Anthropologie. If you're not into the painterly look, I'd say do two coats of paint. They'll probably be a little crunchy, but it's not like you're snugglin' with your curtains. So who cares, right?
And my view down the hall when I walk in the front door :)
So if you're too cheap to shell out the bucks for "real" drapes, make paint you're own!


