Pages

12.19.2013

Postcard Gallery Wall

So, operation big girl room is still an ongoing process. Ongoing meaning mama's been too busy finding creative places to hide Christmas presents to sew any pillows (these kids could be detectives). But, we did get another project done. A few months back Kaley was invited to an American Girl doll birthday party. All the girls dressed up fancy and had a lovely afternoon "tea" (or apple juice) with their dolls. Very cute. In the goody bag to take home from that party was a book of American Girl Doll post cards.

Now, since I am of the thrifty genus and cannot bring myself to spend that kind of money on a doll (we have the Target knockoff) I was not familiar with American Girl. So, I was rather surprised to find such awesome sayings on the postcards we took home. 

So... I thought it would be cool to make them into artwork for her room. She likes the colors and designs too so it's a win win if you ask me. Off to IKEA!
I purchased 16 Ribba frames in gray for $1.99 each. They didn't really have a color that jives with the room so I knew I'd be painting them.

Then I busted out the brightest purple Rust-Oleum makes and went to town.

After they dried I reassembled the frames and added a bazillion Command strips to the backs. Besides the fact that they don't put any holes in the wall, I always use Command strips for a gallery hanging situation. With 16 frames side by side there is no way you'd keep them all hanging straight on nails. If you stick them up with the strips, they don't move ever. Love it.


So now they hang over her bed and some nights she asks me to read a few to her. My favorite is "What I think matters." I think I like that one the most because I need reminding of that sometimes. So while I'm a little sad her pictures of Disney princesses no longer plaster the walls (she's still rocking a Brave poster though), I'm happy they were replaced with something preaching girl power. Hopefully a few of these tiny messages stick.


If you'd like to see more projects from Operation Big Girl Room, click around below.

12.09.2013

'Twas the Month Before Christmas...

This post is part of a social shopper marketing insight campaign with Pollinate Media Group™ and Cottonelle, but all my opinions are my own. #pmedia #CottonelleHoliday  http://cmp.ly/3/8vNxcO.


Did you really write a poem about toilet paper? I did. When I got the opportunity to tell you about Cottonelle Triple Roll I thought, what else is there to tell about toilet paper? Then I remembered that fateful night. (Insert dramatic music) It's story must be told. So sit back, grab a cup of hot chocolate, and and let me entertain you with my TP tales... "The Month Before Christmas".
---------

Twas the month before Christmas, the calendar was marked,
Our party was approaching, tensions were sparked.
The house had been cleaned by the family with care,
In hopes that our friends soon would be there.

The kids made ornaments, the tree was decked out,
A popsicle stick Rudolph was ready to tout.
The music was festive and fun as could be,
And gifts were all wrapped, right under the tree.

The drinks were chilled all snug in their ice,
While mountains of cookies baked warm and nice.
The kids dressed up, even brushed their teeth,
The house was ready with lights and a wreath.

The guests arrived all in droves of twenty,
I knew in a moment, they'd all be hungry.
So into the kitchen I flew like a flash,
To stir the sauce and give the taters a mash.

The best hostess ever, I must say that I was,
Chatting up friends and keeping the room a buzz.
The food was served, libations were flowing,
People were happy, the tree was still glowing.

You could say it was great; the best party ever,
A total success, merry and clever.
When, what to my wondering eyes should appear,
But a tiny naked booty running ever so near.

In the midst of all the giggles and stares,
I scooped up that child and ran back upstairs.
He'd been shouting from the potty for a mom busy hosting,
"Help! We have no TP!" was the cry he'd been boasting.

To the top of the stairs, to the edge of the wall,
That naked booty came down and announced to us all.
The TP was out and he was glad to share,
Mom forgot the triple roll, all naked and bare.

The guests thought it was cute, downright charming,
But when a toddler's unwiped bum runs through your party, I find it alarming.
So I've learned my lesson, have no doubt,
I done with the single roll, no more skimping out.

Off to Target, we went really fast,
I used this coupon, while supplies last.
Cottonelle Triple Roll 12 pack, that be the ticket,
Free Kleenex too, that's why we'd pick it.

Now the rolls stay full longer, and I can sit back,
The naked booties no longer come to the party and attack!
So, if your party was ever ruined; no TP was the reason,
Pick up Cottonelle Triple Roll at Target and relax; enjoy this season.

The End.
------
Do you feel like your holiday is complete now? It's a Christmas classic for sure! Happy holidays!

12.08.2013

Instagram Time Capsule Ornament


Hi everyone! Have you finished your shopping yet? I'm not even close, so we can scramble all hopped up on caffeine together. :) Today I'm guest posting over at Sew Woodsy as part of their 12 Days of Handmade Ornaments. So click here to head over and check out how to make your own tiny time capsule to enjoy for years to come.
.

And don't forget, there's still time to enter the Cricut giveaway. Click here to enter.


Now I need to go shopping!

12.04.2013

Easy Holiday Gift Idea for Teachers

This shop is part of a social shopper marketing insight campaign with Pollinate Media Group™ and Rubbermaid Bento Organizers but all my opinions are my own. #pmedia #HolidayBento  http://cmp.ly/3/8vNxcO


If you're a working mama like me (you're multitasking while reading this, there's laundry on the dining room table, and the bathroom garbage needs to be emptied... but that's beside the point), you've probably got one or more little ones heading to daycare each morning. Before this year, I had two. At our daycare the kids have a main teacher, but are really cared for by many members of the staff. Since daycare is open long hours, half way through the day teacher two comes in to relieve teacher one. There's another person who covers lunch breaks. Floaters and assistants pitch in on the playground, in the halls, and at nap time. And, there's an office staff who give out lolly pops on Fridays (okay, they do other stuff too but that's all the kids care about). It's a well-oiled, child care machine and I am grateful!

Because it really is a small village that cares for my not-so-baby while I'm working, bringing in one gift for his main teacher just doesn't work for me. So, every year we deliver a bunch of goodies for the entire staff to share... lotions, manicure kits, chocolate, gum, supplies, etc. This year is no different except I cranked it up a notch.

Instead of a holiday gift bag that's just going to either get tossed or regifted next year, I went to Target and got a Rubbermaid Bento Organizer. Oh la la. Even my simple, inexpensive gifts (hit up the dollar section while you're at Target!) look special packed up in their little bento compartments. And, when the gifts have been distributed, they can use the Rubbermaid Bento to keep the office organized. Double giftage!

The little flaps on the inside pop out to make a couple different configurations. I popped them both out to keep all of our goodies separated. (You gotta keep 'em sep-ar-ated!... am I showing my age with that song reference?) Candies and gum, office supplies, pampering goodies all tucked away. No mosh pit of cheer... everything neat and pretty for delivery. AND, if you click here, there's a Target coupon for $1 off the organizer. Our Target here had several sizes and patterns available.

My little elf packed everything himself.

Tie it up.

Head out with your box of joy (and try not to eat all the chocolate before it gets there).
So, what are your go-to, stress-free teacher gifts you put together each year? I'd love to hear your ideas! They're always so creative. Happy gifting.

12.02.2013

12 Days of Handmade Ornaments + Cricut Mini Giveaway


Who is still recovering from their turkey coma? I am. Getting the kids, let alone myself, out of bed this morning was not fun. But I have something that might brighten this Monday for ya. I teamed up with Katie from Sew Woodsy and (several other bloggers) for their 12 Days of Handmade Ornaments series. That's right; a different handmade ornament everyday for 12 days. (perfect gifts!) And, we're giving away a Cricut Mini to celebrate. Best Cyber Monday deal ever.

Have you seen what a Cricut can do? They cut paper, fabric, make stencils, vinyl lettering, and so much more. And we are giving one away to one lucky winner! So, head over to Sew Woodsy and see what fabulous ornament is being featured today (mine will be up the 8th!)

This giveaway includes:
Please wait for the Rafflecopter widget to load. To be eligible to win you must fill out the mandatory question. One winner will be chosen at random using Rafflecopter. Giveaway open to residents of the United States ages 18 and up. Giveaway ends on December 12, 2013 at 11:59 pm. Winner has 48 hours to claim prize and will be notified via email.


a Rafflecopter giveaway

11.25.2013

How to Cover an Ugly Light Fixture

Hey there! So I'm starting to recover from the craziness of last week's Share the Joy project, just in time to figure out what to make for Thanksgiving (I should probably buy a turkey soon). If you missed it, I organized a group of Central Florida DIY bloggers to redo the office space at a local foster home. Click here to see the before and afters. Since our budget was limited, we just didn't have the cash to replace all 3 light fixtures in the office. That's when the $6 DIY light fixture was born.

Here's what the existing fixture looked like.
When Christine and I were shopping at World Market for this project, she suggested buying a large drum shade to cover one of the fixtures. Great idea except we seriously didn't even have enough money left to afford one gorgeous shade from World Market. We left without one and I decided to hit up Goodwill that night in search of a DIY fix.

Here's what I found. A wonderfully ugly $6 brown (I think it was painted at some point in its life) oval drum shade. Time to get crafty.

To recover the shade:
Supplies:


Step 1
Cut your fabric about 2" bigger than the height of your lampshade, and long enough to wrap around your shade and overlap a little. (Might want to iron your fabric too if it's wrinkled)

Step 2
Line up the edge of your fabric with the seam on the lamp shade and hot glue along the seam in place.

Step 3
Stretch the fabric around the edges of the shade and hot glue. 
Keep going stretching your fabric, making sure there are no wrinkles and gluing the edges. I did not put any glue in the middle of the fabric, just on the edges as I wrapped it around the shade.

Step 4
Once you get back to your glued seam, trim off the excess fabric (if you have any). Leave about 2-3 inches of overlap.
Fold your fabric under and glue in place. Since I stretched the edges of the fabric so much on my way around the shade, my seam kind of ended up in a curved shape.
And that's it. You may have some extra fabric to trim around the shade and a few spots to touch up with glue. 

Once we got the shade to the children's home, my husband drilled a small hole in the center of the existing fixture cover (the dome-shaped metal thing that covers the wires). Then, we just put a screw and nut through the shade's metal bracket and screwed into place.

And, ta da, you're done. Total project time was about 45 minutes to cover the shade and install.

So if your budget just doesn't allow for completely new fixtures, hit up Goodwill and look for a shade. A simple $6 camouflage job might be all you need.
Thanks to Katie from Sew Woodsy for some of the photos.

11.21.2013

Share the Joy REVEAL

This is a sponsored post written on behalf of World Market's Share the Joy campaign.

What an amazing, exhausting, and rewarding week this has been.  Last week I told you about World Market's Share the Joy campaign (click here if you missed it). Basically, in honor of Share the Joy, World Market challenged me to come up with a community outreach project they could sponsor. In other words, how could I Share the Joy? I immediately thought of local foster homes since I tutored there in high school. Central Florida Children's Home, a local foster home in need, became our target.

The Central Florida Children's Home is a non-profit organization that has been open 40 years. They run 100% on donations and volunteers and currently foster 15 children ages 2-16. There is a house mom and dad (dad is Hiram) and Natalie, who keeps the office in line. These 3 people keep this safe, warm, loving home running.


Asking for Help

When the wheels started turning and plans started to fall into place, I realized I would not be able to make a truly impactful difference alone. I needed help. That's when I went to fellow local DIY bloggers. Katie and Jon from Sew Woodsy, Lauren from The Thinking Closet, Christine from First Home Love Life, and Wendi from H2O Bungalow all jumped at the opportunity (on really short notice!) to make a difference without reservation. Have I mentioned how awesome the DIY blogging community is?


Let's Do More

After the help was lined up, Katie and I both thought, why not see if we can do more. World Market was already providing so much, we decided to reach out to other companies to see if they wanted to lend a hand too. Holy generosity! Thanks to 3M we had plenty of ScotchBlue Painter's Tape to go around, drop cloths, and office supplies. Thanks to our local Home Depot we were able to paint the entire space and do some repairs. Thanks to RYOBI we were able to assemble all of the furniture, hang curtain rods, remove switch plate covers, and install lighting without killing our wrists! And thanks to Homes.com and ForRent.com we were able to purchase all new lighting, a new fan (full tutorial on that here), and decor. I get goosebumps even typing that!

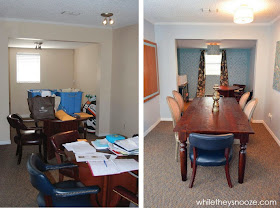
So it was set. The plan was two full days repairing, revamping, and remaking the offices of the home (a separate building just behind where the children live). This is the place where foster parents come to be interviewed, where fundraising happens, where the day-to-day office tasks get done, and (as we found out) where the older kids sometimes come to get some homework done. Since 100% of the little "free" time and money the house mom and dad receive go to the kids, the office just got left behind. Evidence...


Work It!

So are you ready for the good stuff??? Let's get to it.

Have you ever wondered what it looks like when DIY bloggers descend on you for a whirlwind weekend? Like this. #Ithinktheresroombymyfeet


Let's head in the front door.


And the view as you look to your right at the desk Natalie and Hiram share since his office was never finished.


Here's my husband (who stayed 2 full days to help his crazy blogging wife... love ya babe!) and Wendi from H2O Bungalow patching the walls (30+ holes!) and cleaning the windows in Hiram's future office.


And if you turn back and look towards the front door, here's the view.


So the office was cleaned out and we began removing the "1980's furniture" as Natalie lovingly referred to it. We patched the walls, Jon and my husband Jamey fixed a broken window pane and toilet, installed missing baseboards and new lighting, Katie replaced the air filter (post here about that), Christine's husband replaced the rusted AC return vent, we fixed a hole in the floor,...

and painted until our arms fell off. The colors are Light French Gray and Gulf Winds by Behr.

Here's the whole dream team (Brady Bunch Style) hard at work. Lauren, Jon, Jamey (my husband), Katie, Me, Tony (Christine's husband), Wendi, Christine, and Mark (Lauren's husband).


We completed so many projects in just two days it's pretty mind-boggling! Just a few more pics, then the "afters". I promise :). On day two there was tons of furniture assembly, a ceiling fan install, curtain rods to hang, frames to paint, pin boards to cover, a DIY lamp project, and tons of clean up!

The Finish

And then it happened. After 2 full days, we were done. Without further rambling...

DIY chalkboard wall over two Verona Bookshelves and books donated by Houghton Mifflin Harcourt.


Hiram's new office. A combination of existing furniture and a Konrad Desk and Zane Pedestal Table.

The new conference table and break area... mixing old and new again. The back wall stencil is the same one I used on my living room curtains from Royal Design Studio.

New Verona Buffet paired with custom shelves made by Jon and original artwork by Lauren.

Even better than the "afters" were the reactions from Hiram and Natalie on their new space. Relief, joy, and excitement.


As Hiram told us, "Being with the kids is the easy part.  All of the extra stuff is what's hard". We were told over and over "you don't know what this means to us" and "this is huge for us". Honestly, going into this even I didn't realize what an impact we were making. I'm so thankful to World Market and our other sponsors for enabling us to Share The Joy at the Central Florida Children's Home. I can't think of a more deserving group!


So now that you've seen what a few bloggers pulled off in a couple weeks, what could you do to Share the Joy? 
Provide stocking stuffers to a local children's home in your area? Make up a gift basket for the local fire station? From November 8th - December 6th, Cost Plus World Market is giving away a $5,000 American Express Gift Card + $5,000 for a charity of your choice each week for 4 weeks. Can you imagine?! You win $5,000 and get to give $5,000 to charity. For a chance to win, become a fan of World Market on Facebook and click here. Even the simplest things can have a big impact.

A few more for pics for good measure. The DIY light fixture from a $6 Goodwill shade and fabric from onlinefabricstore.net by yours truly.
Looking over the conference table to the break area.
Natalie's area. She insisted Hiram get the new desk from World Market and she have the existing furniture... so we made sure she got the new Pakshi Bird of Paradise curtains from World Market.

To read Lauren's post and see her awesome reveal video, click here.