

The curtains she had before were a solid pastel pink. Now looking at them, I just keep thinking why did I choose solid pink 6 years ago? Curtains are an easy place to add some fun, pattern, and punch to a room. So recently, I searched like crazy locally (okay, like 2 stores, but still) to find a bright pink geometric print fabric to compliment my kid's new bedding. No dice. They were either pastel-ish or muted or floraly (it's a word). I wanted punch, not blah!
That's when I went to the web. Onlincefabricstore.net has sooo many options. Take a gander at the pink lovelies I stalked...


Supplies:
- Sewing machine and the usuals
- Heat-N-Bond
- Grommets (I use Drtiz brand)
- Fabric (yardage will depend on how high you're hanging them... I used about 5 and 1/2 yards)
Here are the grommets I use. This is the 3rd set of curtains I've made with Dritz grommets. They are pretty inexpensive (Around $8 - $11) and you don't need any tools to attach them to your curtains. They also come in a variety of finishes. They are plastic (not metal) but you can't tell at all once they are up on the wall. Very easy to use. I wasn't paid to say that... I just really like these! :)

Step 1
Measure from your curtain rod to the floor and figure out your length. Then, add to that a couple inches for the bottom hem and about 5ish inches for the top hem where the grommets will be. Cut two panels this length. I just use a tape measure on the floor.

Step 2
Fold over the top hem 5" and press. I laid one grommet on top to see how it was going to look. Then I folded the bottom edge of this hem under about 1/2" and pressed again. That way when you sew this part down, all the edges are tucked in neat and nothing will fray.


Step 5
Lay out your grommets evenly across your curtain on top of the upper hem. Make sure to use an even amount of grommets. (4, 6, 8... etc depending on the width of your panel) You must use and even amount so your panels always have a nice fold to the back on either end once they are up. Trace a circle on the inside of your grommet. The grommet package comes with a little plastic template thing. I never use it though. I find it easier to trace the grommets.


Step 6
Cut out the circles you just traced. Since I don't use the template and trace the actual grommets, my circles are actually a little smaller than they need to be. I fix that by cutting just to the outside of the line I traced.

Step 7
Push one side of the grommet through the hole and snap into place using the other side of the grommet. You just push with your fingers. No tools! This part goes really fast.


And that's it. Hang them up. Easier than you thought? These grommets make super quick work of rectangular table cloths too. You can make yourself a set of curtains in less time than one episode of Property Brothers. ;)


Step 2
Fold over the top hem 5" and press. I laid one grommet on top to see how it was going to look. Then I folded the bottom edge of this hem under about 1/2" and pressed again. That way when you sew this part down, all the edges are tucked in neat and nothing will fray.


Step 3
Add a strip of Heat-N-Bond under your 5" hem. I just cut the strip slightly smaller than my flap and stuck it under there. You're just making the top of your curtains a little sturdier to hold the grommets nice and crisp. If you're working with a thick fabric, you can probably skip this step.

Peel off the backing and iron. Just follow the directions on the package.

Step 4
Sew your pressed hems, both top and bottom. I also sewed the side hems at this point by just folding them under once, pressing, and sewing a straight line. Little secret; I did not cut off the selvedge. Since these are in my daughter's room, and pretty casual, and no one will ever see the back... I left it. It saved me a step by not having to fold the sides under twice to prevent fraying. Call the sewing police... it's cool.

Lay out your grommets evenly across your curtain on top of the upper hem. Make sure to use an even amount of grommets. (4, 6, 8... etc depending on the width of your panel) You must use and even amount so your panels always have a nice fold to the back on either end once they are up. Trace a circle on the inside of your grommet. The grommet package comes with a little plastic template thing. I never use it though. I find it easier to trace the grommets.


Step 6
Cut out the circles you just traced. Since I don't use the template and trace the actual grommets, my circles are actually a little smaller than they need to be. I fix that by cutting just to the outside of the line I traced.

Step 7
Push one side of the grommet through the hole and snap into place using the other side of the grommet. You just push with your fingers. No tools! This part goes really fast.


And that's it. Hang them up. Easier than you thought? These grommets make super quick work of rectangular table cloths too. You can make yourself a set of curtains in less time than one episode of Property Brothers. ;)


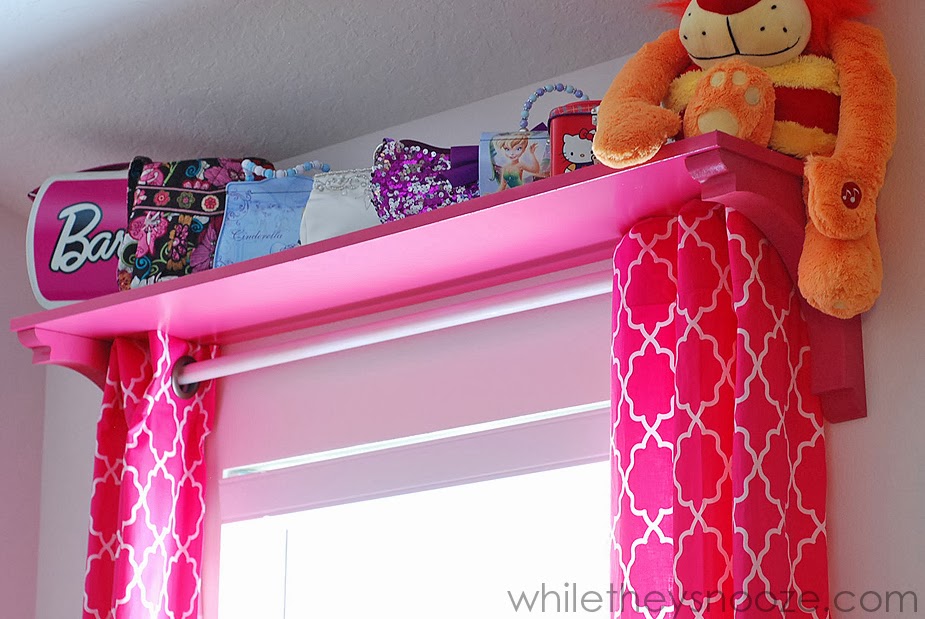
I made the shelf/rod contraption there too. Secret... it was cheaper than a real curtain rod! Details on that soon.
So go visit OnlineFabricStore.net because they can take you from this...

to this. (Okay, they won't take away your clutter, well they might if you ask nicely... but you get the gist)

If you'd like to see where we started or other projects from Operation Big Girl Room, click on the pics below.
Who knew! Love this tutorial! I need to know how to do this for sure! i love the shelf above the rod! That adds so much to the drapes. And you gotta love anything functional for storage like that in a girls room! looks great! love that dresser in her room too!
ReplyDeleteLaura
Thanks Laura! Yes, the grommets are really the best thing ever. For my son's room I found pocket top curtains I loved and just added the grommets myself. Really easy!
DeleteThese came out awesome!! :)
ReplyDeleteThanks Abbey! I love the fabric. So nice and crisp. Can't wait to shop for fabrics for my new house!!!
DeleteLove how your curtains turned out! You will definitely be helping me with my curtains for the nursery! Lol.
ReplyDeleteyou did a very nice job. love the fabric also.
ReplyDelete