3.25.2011

Spring!

Yeay! The trees (& weeds) are green again! It's warm, it's sunny, it's not winter! I know, I know... I live in Florida. It's hot, a lot. But we do get a couple months in the winter where we can't going swimming or break something on the slip and slide. So, in honor of warmer weather, I thought I'd share one of my favorite evening summer-time activities with the kids. Sidewalk Chalk.


What's the big deal? Nothing really. It's super cheap, it comes out of clothing, the rain washes it off, and it's an excuse to be outside (just like bubbles). And so far, the amount that has been in Austin's mouth doesn't seem to be poisoning him. This is our activity while we wait for Daddy to come home from work since I get home with the kids about an hour before he does. Barefoot in the driveway, that's us.

And, you can get some really great colorful photos of your kids. Like this.


And this.


Short on princess crowns? Draw one.


Austin was too small at this time to participate, but he sure loved sitting in his stroller outside just observing.


On one occasion, we backed the cars up a bit to give us more room at the top of the driveway. They just happened to be blocking the sidewalk and we got some evil sneers from a few pedestrians who were forced to take two steps in the grass. They apparently weren't aware of the fun sidewalk chalk is. Thus, another need for this post. Maybe I should have offered them a stick or two? Next time.


Happy tanktoping.

3.24.2011

Sewing: Place Mat Pillow


When I got pregnant with #2, a boy, I was really excited to have a reason to redecorate an entire room (it was our guest room/office). I started in Photoshop and slapped together my ideas. I take a picture of the room then "paint" the walls in Photoshop, add pictures of furniture I like from different websites, add art work, bedding, fabrics, etc. Doesn't everybody do that? (no? heh heh... ummmm) Anyway, here is what the room looks like today...

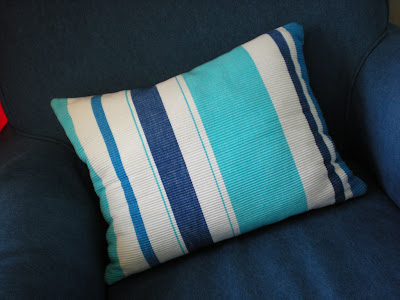
It's light blue, navy blue, white, with an orange accent. The furniture was all bought on Craig's List, the chair is from Walmart.com, and the rest is from IKEA. (That blue chair could sure use a pillow!)

I also had this white ice cream parlor style chair with a pink seat I got at a thrift store many years ago. It traveled to all of my college apartments with me and I couldn't let it go. I think I paid $8 for it, my husband hated it, and it was really uncomfortable. Sounds dreamy, eh? Here's pretty much what it looked like... with a pink upholstered seat.


I decided that I was going to recover the seat and it would make a good place to sit and put on your shoes. Genius! Fast forward to IKEA shopping. I found place mats. Blue and white striped place mats! Like this, but a different pattern...
See how cheap? They would be perfect to recover the chair! I got 2. Then I brought them home and they were too small. Dang it! I guess that's why you should measure and why IKEA provides paper tape measures. So smart of them. They were also too thick to sew together and make a bigger piece of fabric. I thought of that. There would have been a big thick seam in your butt if you sat down. No good.

So, the place mats became a pillow and the chair went to the curb. (Someone took it before the garbage people got there... don't worry... it lives on.. on a farm with other forgotten chairs... and pets... and other gross furniture we have put out there) But I tell everyone that the pillow was my plan all along. Why does it seem like a lot of my craft projects develop from accidents?

Here's the finished product.


3.23.2011

Sewing: Men's Shirt turned Toddler Dress


Let me start off by saying I'm aware of the wrinkled mess this dress is in the first picture. It was either the wrinkled mess picture or the night-time-flash one in our living room (below). I opted for natural light, and plenty o' wrinkles first. The wrinkles were courtesy of an entire day at day care... now you understand. I'm sure there is a pound of sand in her shoes as well. The one with the flash was taken in the morning before day care... yep, still dark out.


I saw this dress here. How awesome is that?! It looked a smidge on the difficult side to me but the tutorial is step by step and I can follow directions. Genius, I know. Here we go! (Hey, that rhymed)

First step, my husband's closet. I know, I raid his stuff a lot for sewing projects. But, since we had just done a closet clean out/Goodwill trip, he had no dress shirts I could cut up. Plan B, go to Goodwill. Since the closest Goodwill to me is actually really close to my work, I went on my lunch break sans kids. One trip through the men's shirts and I found this striped one with some pink it it for $2.00 ish. Did I mention it was a men's XXXL?! So much fabric for $2! Awesome!

Side note: Those pink shoes she is wearing I also got on the Goodwill trip for $4! They are from Gymboree... score!

Here is a really horrible picture I took with my phone the night I started to cut the shirt up. Since the picture was so bad anyway, I crapped it up further by making it black and white, super grainy, and added some lovely hand drawing ala the mouse.


There's my kid sitting on the shirt. If she were to lay down she wouldn't even take up half. It's huge. I also want to point out she went to bed right after this photo. I don't know how the tutorial lady did it with her kid there and awake. I sewed while the kids slept and my husband was on a conference call. I do remember running in to excitedly mime to him the progress I was making while waving dress parts in his face. And him waving me off like a I was a crazy homeless person trying to wash his windows or something. Maybe I should have waited until he was off the phone. hmm.


There's the post daycare wrinkletastic back. I did not do the knife pleats in the tutorial. I opted for a simple ruffle. All of the pink you see is that same Walmart curtain panel I bought for $4. I also used it in the Ballet Bag and still have tons left over. I will be shopping the dorm room section again this fall : )

I think the sleeves are so cute. Make one! Goodwill has way too many dress shirts anyway. Can you tell someone is really sick of taking pictures?


The end.

Sewing: Baby Yoga Pants


So, I have a confession. I have made very few things for my little boy. Let's admit it... girl stuff is just so cute and easy to make. A skirt is a tube of fabric with an elastic at the top. Easy peasy. Pants and shirts are harder.

I knew a lot of bloggers/crafters out there were making pajama pants (Or yoga pants. Many people stop short of calling them "pajama pants" because of all the rules there are with infant pajamas... fire resistant, yada yada) so I decided to give it a try. If they can do it, I can do it, right? Because I was pretty sure these were going to come out terrible, I didn't buy anything for this project. : ) Here's where I went for instruction.

I cut up an old t-shirt of my husband's (he won't even know it's gone... I think it had Woody Woodpecker on the front. Eww.) and used navy blue thread because I didn't have any brown. Ha! You can even see the blue thread in the pictures. Bad, I know. However, they actually turned into functional pants! Even with my lack luster attitude, I managed to make some pretty stinking cute yoga pants for my little man. (ok, maybe it's the baby that is making them cute... and not the actual pants that are cute..hmmm)


My mistake this round: I cut the crotch length too short (Maybe I should have paid attention more to step 6 in the tutorial... haha, nervous laughter). Before you sew the elastic in, it looks like you are making old man pants that are going to come up to his pits. But, after you fold it down twice and make the casing for the elastic, they should come up right to his belly button. I saw the old man pants taking shape prior to making the elastic casing and cut them down. Now they don't come up high enough to cover his diaper. Oh well. Live and learn.

There's his big sister showing off the brown pants/blue thread special in her stylin' purple monkey jammies, as we call them. (Gotta love Target clearance)

3.20.2011

One of those days

It's been one of those days. No second nap for kid #2, and no nap at all for kid #1. Day 3 of getting rid of the bottle cold turkey (why is this so difficult... it's milk! Drink it!). Laundry as far as the eye can see. College basketball on TV as loud as my husband can possibly put it without his ears bleeding. Unmade beds. Dirty dishes. Weeds taller than my kids in the back yard. Dust bunnies having a party behind the couch. A toilet that could really use a scrub. It's like I'm on a treadmill that day by day gets faster and faster and I can never get off. I organized the kids puzzles and games in the living room only to have them tear them apart 20 minutes later. So then I feel like what's the point? But at the same time, if I don't maintain constantly, it's going to get really out of hand, really fast. Like Hoarders out of hand. Or at least those are the visions I have in my head (minus the dead cats).

I just can't keep up, and I only have 2 kids! How do you do it with more? With a bigger house? It seems impossible. Maybe I'm doing something wrong. Maybe stay-at-home moms who love their stay-at-home lives have some secret I am not aware of. How do you break out the bleach and give the toilets a scrub when a 1 year old wants to join you and - A. breath in the fumes, and - B. touch everything? And emptying the dishwasher is like an invitation to grab knives as quickly as possible. How does he grab them so fast? It's like he turns into stealth ninja baby.

I know I shouldn't complain. I have two healthy kids, a loving husband, and a roof over my head. It's all I ever wanted as far back as I can remember. I guess it doesn't need to be clean all the time. But it's like that lie that is the cover of every magazine. You see a woman who is impossibly beautiful because she's been retouched ala Photoshop, and you think that's what you have to be to be beautiful. I'm well aware of the Photoshopping that takes place and still compare myself to those women. I see homes in magazines, on commercials, in TV shows and think people really live like that. There's never sticky juice spots on the kitchen floor, never a pile of laundry preventing the hamper lid from closing, never the smell of poopy/chicken carcass garbage that hits you when you walk in the door from work because you forgot to take it out in the morning after you threw that diaper in there and the leftovers from last week, never that ring in the toilet that never comes off (though I guess no one is filming the insides of toilets) never globs of toothpaste stuck to the sink. Know what I mean?

On the weekends I can get the house back to acceptable. Towards the end of the week, it looks like a frat house with some toys sprinkled in. On Fridays I get worried that someone might happen to unexpectedly drop by and see what we're living in. Sometimes I think, I should just forget about the laundry right now and play with my kids on the floor. So I do, and then someone doesn't have any clean underwear the next day. And you can't really pull dirty underwear out of the hamper, spray it with Febreze and throw it in the dryer. That only works with semi-dirty non-crotch-touching items. Not like I do that or anything... never mind.

I've have learned to combine play and housework. They do like to help me when I ask but do I really want to turn every task into a project involving two toddlers? "Don't eat the dryer lint!" Sigh...

Such are the struggles of a mom. Work/play/kids/cleaning/cooking/and fitting in sleep. It reminds me of a quote I've seen a few times lately... or maybe it's an Irish blessing?

"May you live as long as you want, And never want as long as you live."

I'm working on it.... but I still want a clean house.

3.18.2011

Sewing: Felt Pillow


Here's a project that came about because I saw this pillow here and wanted to make it immediately. Not having all of the supplies I should have at home and not wanting to go shopping, I winged it with what I could find. It actually came out better than I thought, though one of the most tedious projects ever! Seriously, if you're into quick, don't do this. It took forever!


I had small sheets of felt at home, not one large piece. Therefore, the front is actually made up of 4 of those pieces sewed together. That's why you can see that lovely seem down the middle.

Next, you have to cut about a million small circles. Since I do not have any sort of die cutting machine, I cut them all with scissors. Lots of swearing and several episodes of Biggest Loser later, I had about 1/4 of the circles I needed. Ugh. On to Hoarders and more cutting.

Next, I ran out of the pink felt I used for front of the pillow and had to make more circles out of a different color pink. I planned on it all being the same shade but I REALLY didn't feel like buying more felt.

And finally, since I used up all of the pink felt to make horrible circles, I had none to make a back for the pillow. What to do, What to do? Scour your kid's room for anything that is pink and they won't miss! Yeah, that's it! I found an old baby blanket in my daughter's room... Pink stripes, close enough!


In the tutorial I followed, all of the circles were sewed by hand! No really, by hand. If I went that route, I'd still be sewing circles. Instead, I folded and grouped them in twos and ran the bottoms under the sewing machine. Then, I hot glued the clusters to the pillow front. I was sure they were going to fall off eventually, but 6 months of being on a 3-year-old's bed later, still holding strong! Yeay hot glue!


It really is a cool pillow. I've gotten several compliments on it and a few people who wanted to know if I'd make them one... to which I kindly directed them to the tutorial and wished them luck. : )


My kid loves her ruffle pillow too.

3.17.2011

Sewing: Ballet Bag


So in school, I was a bit of a jock. Yes, I did cheerleading, but over the years I also played softball, soccer, tennis, ran track and cross country and did a small amount of time with the swimming team. I loved sports. So when my daughter was born, I had visions of her in her shin guards, scoring goals at 4 years old. Over the next few years I even picked up a pair or two of cleats at various consignment sales sure that one day she would need them. Then she turned 3.

It was time! Time to start looking for things to enroll her in! Yippie! However, the only thing she ever seemed to talk about was princesses and ballerinas. Seriously, a girly girl. No problem. I too was a girly girl who could also kick a soccer ball and swing a tennis racket. She would of course do the same. No dice. Even with my pushing, er, I mean encouragement, she was addiment that she wanted to be a ballerina. The final straw came when I picked her up from daycare one day and ran into her best friend all dressed in a tutu on her way to dance. My battle was over. "Mom! Jayden is a ballerina! I want to go to dance class!". She realized that there actually was a place to go to be a ballerina. Thus, my child does ballet every Thursday and loves every second of it.

Because I had zero experience in anything dance, I didn't know what to expect. Luckily, several cousins and close friends knew what I needed and got me on the right track... tights, ballet shoes, leotard, etc. Check. We arrived the first day, and she jumped right in. Smiled the whole time. I took a million pictures.


Then class ended and all the girls ran up to the front of class to grab their bags full of who-knows-what, and left. There was my daughter. Standing alone in the middle of the room in tears... she had no bag. "Mommy, I want a bag too!" Not in a whiny, I want-my-way-all-of-the-time cry, but in a I'm-the-outsider, I-feel-really-left-out kind of way. I felt so bad. (mommy guilt, mommy guilt!) I knew what I had to do... time to make a bag pronto. Next dance class was in one week and she would have a bag to grab at the end of it! (even if it was filled with blankies, Snow White's broken shoes, play dishes, whatever...)

I went to my trusty craft blogs and found it here. Perfect. I even had all of the supplies on hand and bought nothing for this project. The pink fabric is a curtain from the Walmart dorm room section I got on clearance for $4! I bought this for another project and have tons left over still. The lining is another Walmart special I got in the remnant stack for a couple bucks also for another project. And the applique is left overs from a skirt I made, a scrap of felt, and a random button. (I went applique style since I didn't have any fabric paint) It came out awesome and I have plans to make a larger version beach bag for myself.

You now know the story of the ballet bag... isn't mommy guilt harsh?


Mom Tips Part 1

Because I was the first of my friends to have kids, I became the veteran mom when they started to have kids. Not that I have 8 kids or anything, but I had one kid at the time that had made it to two years old. So I think they figured if she was still alive, I'm doing something right. Here are some tips I have come up with that seem to have worked well for me.

• Buy used. They are going to out grow it, poop on it, puke on it, draw on it, swim in dirt in it anyway.

• Use the money you saved buying used to start a college fund.

• Park next to the cart returns in parking lots. You can load up toddlers and heavy baby car seats and push them into the store. Less sweating on your part.

• When your baby/toddler wakes up with a high fever, administer Tylenol and wait 15 minutes before making any decisions about rushing to the emergency room at 3am.

• Use coupons. If you are going to buy the stuff anyway, save the $3. If someone mailed you $3 in cash, you'd take it. $3 in coupons on things you buy anyway is the same thing... cash in your pocket.

• Buy Pampers. Cheap diapers suck.

• Take a lot of pictures and videos. You'll never regret having too many.

• When your newborn cries or makes any noise for that matter, just feed them. Ignore that every 3 hour BS. Pretty much never stop feeding them until they are 3 months-ish. Then maybe you can start timing things. (I credit Jess with this one)

• You will say the words... "but I just fed him/her" a hundred times when you have a newborn. See above tip on what to do.

• Daycare is never going to be awesome. There are going to be days when you hate dropping them off. But there are going to be days you can't wait to drop them off and sing old school Mariah Carry in your car as you drive away sipping your coffee for the 20 minute "me-time" you get on the way to work. It's a trade-off. Find the balance that works for you.

Sewing: Tank Revamp Toddler Dress

This dress came about when I took a stroll through the Walmart fabric section on my lunch break and saw this paisley. Had no idea what I was going to do with it, but I loved it. Five dollars and a wait in the Walmart check-out, it was mine. Weeks later, I remembered that I had an old Target tank top remnant (I cut the bottom off of it for another project) sitting in my fabric pile at home (Juniors-sized tank). I put the two together, and came up with a dress for my sassy 3-year-old.

I started by measuring my kid (I got her to sit still with a combo of snacks and “Princess and the Frog”). I put the tank on her inside out, pinned the straps at the shoulder to fit her, and marked how long I wanted the tank portion. I didn't have to take in the sides because it was the "long and lean" variety of tank which is code for, "you will look like a sausage stuffed in here". Really small... the reason this tank got cut up. Then I measured (eyeballed) how long to make the skirt portion (it ended up about 18"). I cut a rectangle of fabric 18" x however wide my piece was from the paisley (I know, very exact) and sewed it into a tube. I used “french seems” which I learned from here. This is when I stopped and waited for the kids to sleep. Having a hot iron, a sewing machine, and kids up and running gives me heartburn.

After dinner, baths, a bottle, the nightly brush-your-teeth fight, having to pee 3 times, and finally bed, I got back to work.

Realizing in my excitement I completely forgot about adding for seam allowances and cut the skirt portion too short (doh!), I decided it needed a ruffle at the bottom... yeah, that's what I meant to do all along. I cut a 3” wide strip and made it twice as long as my skirt rectangle, hemmed it, and sewed it into a tube. This required me to sew two pieces together to get it really long. Then I pinned like crazy and sewed them together (I am still shocked this came out as well as it did).
Next, sewed the skirt portion to the tank and added the satin ribbon on top leaving the ribbon free at the back.
All was well until 3-year-old put it on and kept pulling the front down to her bellybutton in a very non-lady-like fashion. (Look mom, boobs!) Sooo, I figured the tank was still too big. I gathered up the front a smidge, and hand sewed that like so.

Done! Total cost was about $5 and I recycled an old tank. Go ahead, try it.  That old shirt is too tight anyway.