10.25.2013

Life Inspired Link Party #10

It's link party day which means it's the last Friday of the month which means October is almost over which is CRAZY to me. Time just flies when you're old! I totally remember toasting on New Year's Eve to a great 2013. Now it's almost over. My wrinkle cream can't keep up.

Last party there were lots of great link ups! Thanks so much for sharing your stuff. I love spying on all of you. Without further ramblings, here are a few I'd like to try.
I can totally see this in Austin's room. He'd love it.

Oh my goodness I want to make this so bad! I need some friends to have some girl babies. Get on at. K? Thanks.

You know I'm a sucker for a good printable. This one you can color yourself!  Love that. Great idea.

How could I not love the minion?! Yep, more people definitely need to have some babies so I can make this stuff. :)

So are you ready to link up, get your trick-or-treat on and head into November? Can you hear the Christmas music now?


10.24.2013

Printable Monster Art

This post is sponsored by Monsters University. All opinions and ideas are 100% my own.
So, Halloween is next week. I haven't bought my candy yet for fear I will eat it all before the kids arrive. I know myself. The Almond Joys don't stand a chance. But we have been building up our Halloween anticipation in other ways. The costumes are part made and mostly bought, the decorations have been strewn about, and we've been watching Monster's University on loop for since it arrived. (Funny side note: the kids get the words University and Anniversary confused so most of the time they ask to watch "Monster's Universary". Ha!). Such a great not-so-scary option to get the kiddos (and you) in the Halloween mood.

While the kids were watching I did most of the decorating. The wall just beside the front door has been bare since we moved in. I planned on jazzing it up for Halloween but really always wanted something there year round. So, I figured out a way to do both. 


You see, we've been needing a way to display quick art besides covering the side of the fridge. You know... kid art (I could open a gallery), seasonal stuff, cool greeting cards, printables, and pictures. So, I created an easily changeable "art" display that I could decorate now for Halloween but change easily throughout the year... and it's so simple!


Supplies:

Clip Boards
Craft paint and brush
Command Hooks or nails
Monster Art!

Step 1:
Paint your clipboards. I chose white so anything I put on them will "go" but the color (or pattern) is up to you. It took a couple coats and dried in no time.

Step 2:
Arrange the hooks evenly on the wall and hang your boards. If you keep them in a neat row it looks more gallery-like but if random floats your boat, go with it. I use removable hooks because I'm renting but small nails would work just as well.

Step 3:
Create your own Monster art or download the printables I designed based on our favorite characters from the movie.


Did you guess who was who? Art, Don Carlton, Mike Wazowski, and Sully... but, get creative! Crayons, paint, buttons, yarn would all look fantastic. Right now I'm digging the modern look of the printables but I know soon they will be replaced with the kids' renditions. Can you see the glitter now?


Step 4:

Display and walk away! I just made that up. (I can see your eye roll from here) But really, it's so simple to give all our art it's time in the spotlight now and not have it get buried under pizza coupons on the fridge.
 

So go create your own Monster art while you're carving that pumpkin. Follow Monsters University on Facebook, Twitter, and Pinterest for some fantastic art inspiration. And, Monsters University will be available on Blu-ray Combo Pack October 29th (you can click here to find it) just in time for Halloween.

Now come snoop around the other projects inspired by Monsters University.


10.23.2013

Free Owl Printable Invitations

Happy Wednesday ya'll. Just a quick post of free printables today. A few months back I designed an invite for a baby shower at work. The theme was pink and yellow and owls and girly. So cheery. Since Katie from Sew Woodsy and I work together, she posted about it here. Go look. So cute right?

For months now this invite has just been collecting digital dust on my computer. Not doing much good there so I thought I'd share.  I also changed up the colors and made a blue version as well. The invite is 5" x 7".
The PDF contains a version without crop marks and a version with crop marks.  Use whichever suits you best. Enjoy your hump day.

10.16.2013

How to Make Grommet Top Curtains

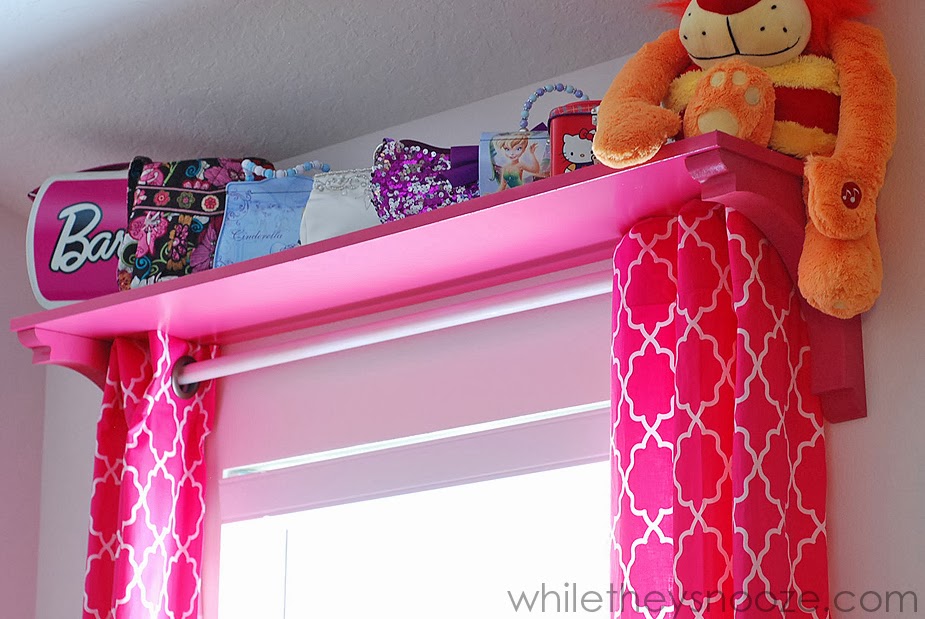
Still movin' and shakin' (well, more like crawlin' and jigglin'... mental note to resume jogging, ugh.) with Operation Big Girl Room. This weekend I finished up some cuddle-worthy grommet top curtains made with fantastic fabric from Online Fabric Store.net.  They're my new BFF after we were introduced at Haven Conference this year. They don't know that, but it's totally true. Promise. I shopped and asked OnlineFabricStore.net to provide fabric for this post and they graciously agreed. 

The curtains she had before were a solid pastel pink. Now looking at them, I just keep thinking why did I choose solid pink 6 years ago? Curtains are an easy place to add some fun, pattern, and punch to a room. So recently, I searched like crazy locally (okay, like 2 stores, but still) to find a bright pink geometric print fabric to compliment my kid's new bedding. No dice. They were either pastel-ish or muted or floraly (it's a word). I wanted punch, not blah!

That's when I went to the web. Onlincefabricstore.net has sooo many options. Take a gander at the pink lovelies I stalked...
I absolutely love the anchors but decided against it since the main color is white. I really needed something bold to contrast the neutral wall color. Now I just need a project I can use those anchors for. Hmmm. I decided upon Michael Miller Moroccan Lattice Pink Fabric. It's nice and bright but not too juvenile. I also really like the graphic punch of the Moroccan pattern. (Note the coffee)
Now that we have some gorgeous fabric, let's make some curtains.

Supplies:
  • Sewing machine and the usuals
  • Heat-N-Bond
  • Grommets (I use Drtiz brand)
  • Fabric (yardage will depend on how high you're hanging them... I used about 5 and 1/2 yards)
Here are the grommets I use. This is the 3rd set of curtains I've made with Dritz grommets. They are pretty inexpensive (Around $8 - $11) and you don't need any tools to attach them to your curtains. They also come in a variety of finishes. They are plastic (not metal) but you can't tell at all once they are up on the wall. Very easy to use. I wasn't paid to say that... I just really like these! :)

Step 1
Measure from your curtain rod to the floor and figure out your length. Then, add to that a couple inches for the bottom hem and about 5ish inches for the top hem where the grommets will be. Cut two panels this length. I just use a tape measure on the floor.

Step 2
Fold over the top hem 5" and press. I laid one grommet on top to see how it was going to look. Then I folded the bottom edge of this hem under about 1/2" and pressed again. That way when you sew this part down, all the edges are tucked in neat and nothing will fray.

Step 3
Add a strip of Heat-N-Bond under your 5" hem. I just cut the strip slightly smaller than my flap and stuck it under there. You're just making the top of your curtains a little sturdier to hold the grommets nice and crisp. If you're working with a thick fabric, you can probably skip this step.
Peel off the backing and iron. Just follow the directions on the package.


Step 4
Sew your pressed hems, both top and bottom.  I also sewed the side hems at this point by just folding them under once, pressing, and sewing a straight line. Little secret; I did not cut off the selvedge. Since these are in my daughter's room, and pretty casual, and no one will ever see the back... I left it. It saved me a step by not having to fold the sides under twice to prevent fraying. Call the sewing police... it's cool.

Step 5
Lay out your grommets evenly across your curtain on top of the upper hem.  Make sure to use an even amount of grommets. (4, 6, 8... etc depending on the width of your panel) You must use and even amount so your panels always have a nice fold to the back on either end once they are up. Trace a circle on the inside of your grommet. The grommet package comes with a little plastic template thing. I never use it though. I find it easier to trace the grommets.

Step 6
Cut out the circles you just traced. Since I don't use the template and trace the actual grommets, my circles are actually a little smaller than they need to be. I fix that by cutting just to the outside of the line I traced.

Step 7
Push one side of the grommet through the hole and snap into place using the other side of the grommet. You just push with your fingers. No tools! This part goes really fast.


And that's it. Hang them up. Easier than you thought? These grommets make super quick work of rectangular table cloths too. You can make yourself a set of curtains in less time than one episode of Property Brothers. ;)
I made the shelf/rod contraption there too. Secret... it was cheaper than a real curtain rod! Details on that soon.
So go visit OnlineFabricStore.net because they can take you from this...
to this. (Okay, they won't take away your clutter, well they might if you ask nicely... but you get the gist)

If you'd like to see where we started or other projects from Operation Big Girl Room, click on the pics below.

10.15.2013

Easy Halloween Chalkboards

This is a Sponsored post written by me on behalf of Dollar General for SocialSpark. All opinions are 100% mine.
October is a BIG month in our family. My daughter, neice, and dad all have birthdays this month. There's also a couple anniversaries, not to mention Halloween (and all the school events that go along with that... how many costumes does one kid need, really?). Needless to say, we see a lot of each other during the month of October and entertain almost every weekend. Because my house is already decked out for Halloween, I just roll with the theme for the rest of the events. (Sure there might be a princess crown thrown in here and there)  This week the kid and I made little Halloween chalkboards to label our goodies when the whole fam is over for such events.

Since it's 5 seconds from my house (yay for no traffic!), I was happy to get my Halloween supplies at Dollar General. They had an entire Halloween isle with not only decorations, but party supplies and some costume items too. I picked up a few things there and a couple frames from the home isle.  I think I bought out the googly eyes. Sorry about that. :) I was going to list out the supplies for this but really it's entirely up to you. You really just need frames, hot glue, and a variety of small Halloween items. I chose googly eyes, spider rings, and glow-in-the-dark skeletons.

Step 1: Remove the glass from the frames.

Step 2: Hot glue your favorite items to the frames. We painted the backs of the skeletons white first so they would show up better and cut the ring part off of the spiders so they would sit flat.

Step 3: Paint an old cereal box with chalkboard paint, cut out a rectangle, and add it to the frame. If you don't have chalkboard paint, you could always use a sheet of black construction paper. You'd just have to change the paper out each time you wanted to change the sign.
Reassemble your frame (no glass) and that's it. Really easy, really inexpensive, and a fun afternoon craft with the kids. These are especially helpful when you have a kid's punch and an, a'hem, adult version. :) For even more Halloween ideas, crafts, recipes, and party ideas, follow Dollar General on Facebook and Dollar General on Twitter.
Visit Sponsor's Site